It's that time again, another Facebook Hop from the wonderful designers over at the Etsy Digital Designers team. This time it's a summer vacation theme with fun, bright colors. Everyone has been hard at work getting things setup for you all to download for free, so make sure you don't miss out on all the action.
You can check back on my Facebook page on June 5th for the download links! Make sure you check out all of the other Facebook pages involved as well so you can get tons of freebies!
Here's a preview of what I'll be posting, let me know what you think!
Friday, May 31, 2013
Friday, February 1, 2013
Valentine's Day Freebies!
This past week I participated in my first ever Facebook Hop! It was such a blast and there were tons of free clip art sets to be found. In case you don't know what a Facebook hop is, it's basically a big link up where you can click around to different Facebook pages. The great ladies over at the Digital Designers team on Etsy hosted it and all contributed a set of graphics for people to download for free.
It's not too late for you to go check it out and scoop up all the goodies, so get on over to Facebook and have fun with all the fabulous images you can download. They're all matching because we used a specific color set, so you can run wild and mix and match all your new freebies.
My facebook page is right here and all you need to do is like my page and click the "Facebook Hop" tab at the top to find the download.
Here's the full list of all the participants as well as their Etsy Shops and Facebook pages:
Digi BonBons Etsy Shop - Facebook Page
Lovelytocu Etsy Shop - Facebook Page
Wisteria Design Studio Etsy Shop - Facebook Page
Clementine Digitals Etsy Shop - Facebook Page
Sonya DeHart Etsy Shop - Facebook Page
Poppy Hill Creations Etsy Shop - Facebook Page
The Paper Pegasus Etsy Shop - Facebook Page
Inkbite Designs Etsy Shop - Facebook Page
Arigigi Pixel Etsy Shop - Facebook Page
Fancy Dog Studio Etsy Shop - Facebook Page
Printable Wisdom Etsy Shop - Facebook Page
Sher Hastings Designs Etsy Shop - Facebook Page
Digi Scrap Delights Etsy Shop - Facebook Page
Lilian Ellaboudy Desgn Etsy Shop - Facebook Page
Tout Aimee Etsy Shop - Facebook Page
Chocolate Rabbit Etsy Shop - Facebook Page
Simply Brenna Etsy Shop - Facebook Page
Pink Fox Design Etsy Shop - Facebook Page
Cherie's Arts n Crafts Etsy Shop - Facebook Page
It's not too late for you to go check it out and scoop up all the goodies, so get on over to Facebook and have fun with all the fabulous images you can download. They're all matching because we used a specific color set, so you can run wild and mix and match all your new freebies.
My facebook page is right here and all you need to do is like my page and click the "Facebook Hop" tab at the top to find the download.
Here's the full list of all the participants as well as their Etsy Shops and Facebook pages:
Digi BonBons Etsy Shop - Facebook Page
Lovelytocu Etsy Shop - Facebook Page
Wisteria Design Studio Etsy Shop - Facebook Page
Clementine Digitals Etsy Shop - Facebook Page
Sonya DeHart Etsy Shop - Facebook Page
Poppy Hill Creations Etsy Shop - Facebook Page
The Paper Pegasus Etsy Shop - Facebook Page
Inkbite Designs Etsy Shop - Facebook Page
Arigigi Pixel Etsy Shop - Facebook Page
Fancy Dog Studio Etsy Shop - Facebook Page
Printable Wisdom Etsy Shop - Facebook Page
Sher Hastings Designs Etsy Shop - Facebook Page
Digi Scrap Delights Etsy Shop - Facebook Page
Lilian Ellaboudy Desgn Etsy Shop - Facebook Page
Tout Aimee Etsy Shop - Facebook Page
Chocolate Rabbit Etsy Shop - Facebook Page
Simply Brenna Etsy Shop - Facebook Page
Pink Fox Design Etsy Shop - Facebook Page
Cherie's Arts n Crafts Etsy Shop - Facebook Page
Thursday, January 17, 2013
Original Nestle Toll House Chocolate Chip Cookies
Today I'm bringing you another cookie recipe, but this time it's a classic. You can't go wrong with these cookies, they are pretty much the perfect chocolate chip cookie. I made half a batch and there were still PLENTY, so if you're baking these for only a few people, I would definitely suggest cutting the recipe down.
Here's what you'll need to get started on these delicious cookies!
Ingredients:
- 2 1/4 cups all-purpose flour
- 1 teaspoon baking soda
- 1 teaspoon salt
- 1 cup (2 sticks) butter, softened
- 3/4 cup granulated sugar
- 3/4 cup packed brown sugar
- 1 teaspoon vanilla extract
- 2 large eggs
- 2 cups (12-oz. pkg.) NESTLÉ TOLL HOUSE Semi-Sweet Chocolate MorselsNESTLÉ® TOLL HOUSE® Semi-Sweet Chocolate Morsels
- 1 cup chopped nuts (optional)
Combine flour, baking soda and salt in small bowl.
Beat butter, granulated sugar, brown sugar and vanilla extract in large mixer bowl until creamy.
Add eggs, one at a time, beating well after each addition.
Gradually beat in flour mixture.
Stir in morsels and nuts.
Drop by rounded tablespoon onto ungreased baking sheets.
Bake for 9 to 11 minutes or until golden brown. Cool on baking sheets for 2 minutes; remove to wire rack to cool completely.
And you're done! Try not to eat them all at once!
Here's the full ingredients for easier reading:
Directions
PREHEAT oven to 375° F.COMBINE flour, baking soda and salt in small bowl. Beat butter, granulated sugar, brown sugar and vanilla extract in large mixer bowl until creamy. Add eggs, one at a time, beating well after each addition. Gradually beat in flour mixture. Stir in morsels and nuts. Drop by rounded tablespoon onto ungreased baking sheets.
BAKE for 9 to 11 minutes or until golden brown. Cool on baking sheets for 2 minutes; remove to wire racks to cool completely.
Recipe from here.
Wednesday, January 2, 2013
Crochet Wrap
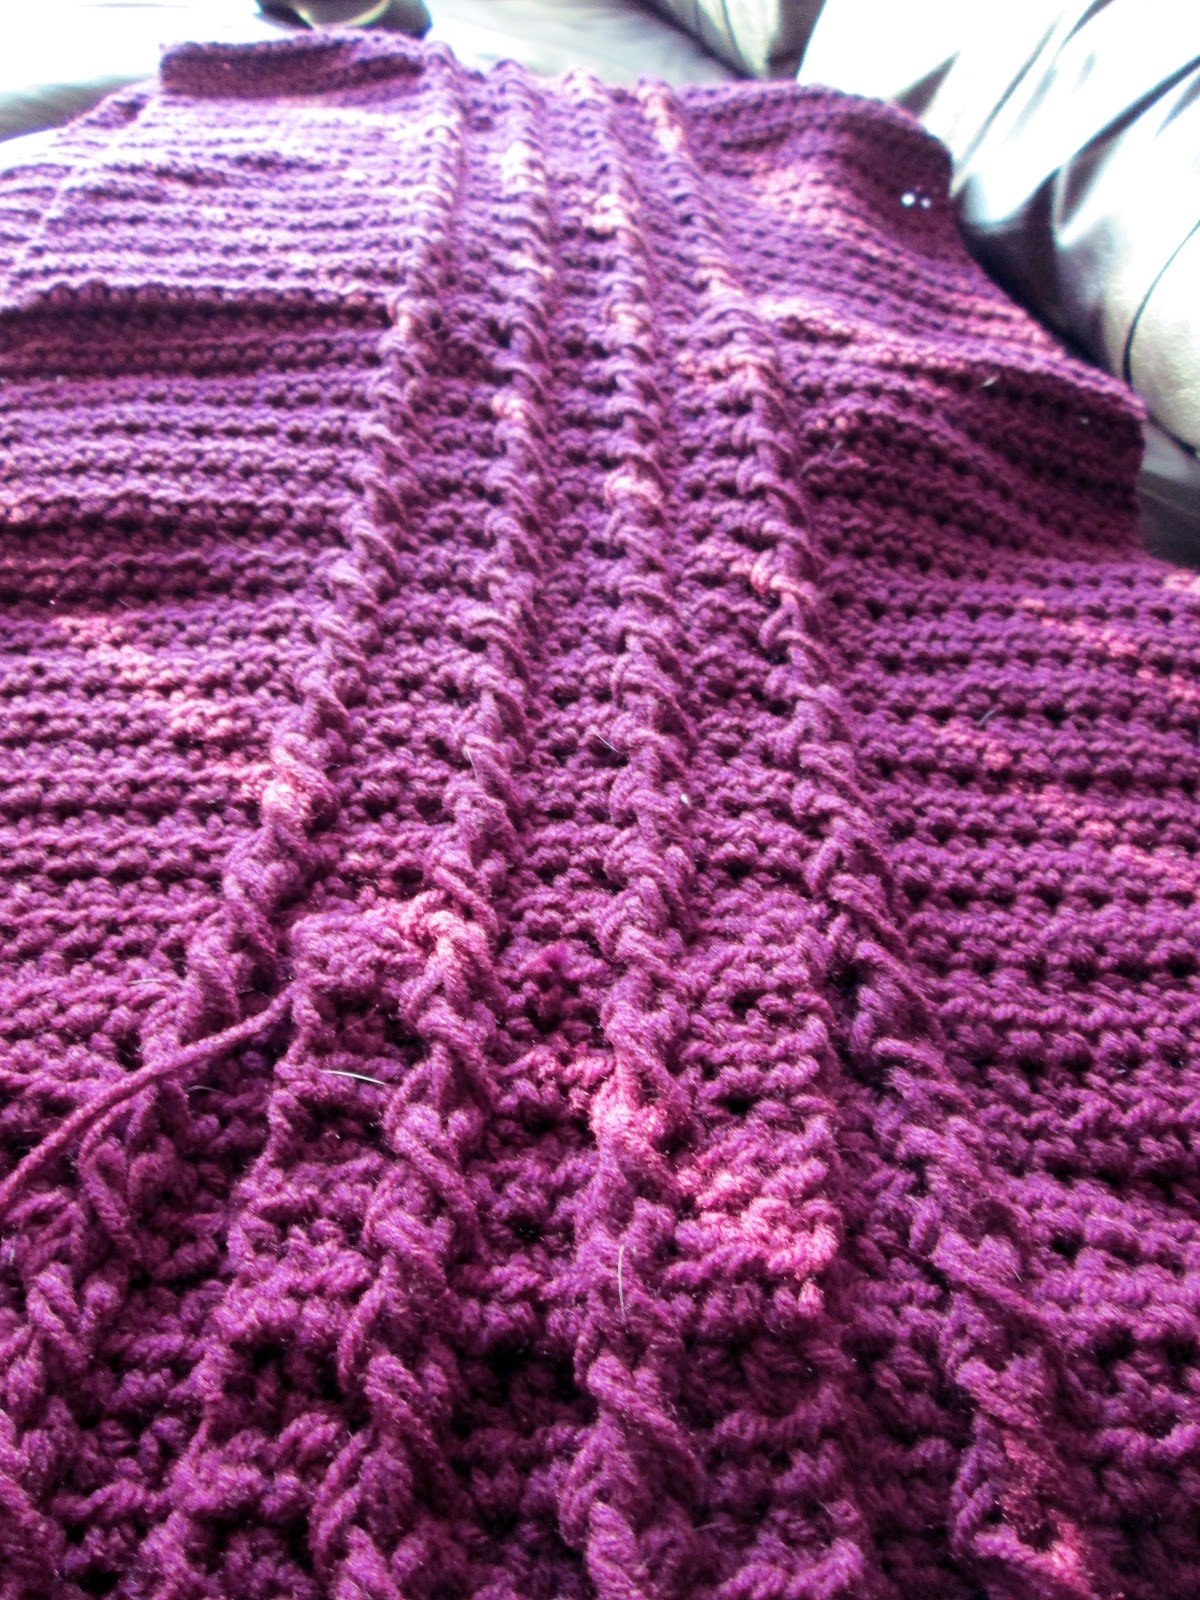
I've recently picked up crocheting again after a fairly long hiatus. It's been almost a year since I've done any real crocheting, but I have a lot of spare time these days so I figured crocheting would be the perfect time filler. Since being in Toronto, I've been free of all responsibilities which means I have WAY too much free time. After putting some serious Netflix hours in, I decided I needed to do something else with my time. We headed down to the local Wal-Mart and I picked up a ton of yarn and got to work.
One of my current favorite projects is this crochet wrap by Kimberly McAlindin. I picked up a pound of this beautiful deep magenta color yarn which I thought would look fabulous for this pattern. The pattern is super easy once you get it figured out. The author has some youtube videos up that explain the entire pattern for you in case you get stuck (which I watched and thought were SUPER helpful). Sadly, I ran out of yarn with about 40 more rows to go, so my wrap is not yet complete. Hopefully I can run out and get some more yarn soon so that I can finish it...I can't wait to see how it looks on.
So what are you currently working on...any fun crochet or knitting projects? Or maybe something else crafty? Leave me a comment so I can check it out!
One of my current favorite projects is this crochet wrap by Kimberly McAlindin. I picked up a pound of this beautiful deep magenta color yarn which I thought would look fabulous for this pattern. The pattern is super easy once you get it figured out. The author has some youtube videos up that explain the entire pattern for you in case you get stuck (which I watched and thought were SUPER helpful). Sadly, I ran out of yarn with about 40 more rows to go, so my wrap is not yet complete. Hopefully I can run out and get some more yarn soon so that I can finish it...I can't wait to see how it looks on.
So what are you currently working on...any fun crochet or knitting projects? Or maybe something else crafty? Leave me a comment so I can check it out!
Wednesday, December 19, 2012
2013 Calendar Printables
Hey everyone! I made up some 2013 calendar printables and decided to post them on here so that everyone else can have a chance to enjoy them as well.
They're all fun colored chevron designs and will fit perfectly on an 8.5x11 piece of paper.
I'd love to hear what you think of these. Leave me a comment if you decide to download them, enjoy!
They're all fun colored chevron designs and will fit perfectly on an 8.5x11 piece of paper.
Just to give you an idea about what the full size months look like, here's February. There's plenty of space in the boxes for you to add in your appointments or activities.
I've uploaded the file as a single PDF, which you can download here.
Or you can download it as .zip file and find each individual month here.
Tuesday, December 18, 2012
Mexican Stuffed Peppers
Ok so bear with me because I know this picture isn't going to look the most appetizing (my camera is back in the states so I'm forced to use my phone for all these pictures), but I promise you that these peppers are HEAVENLY.
My dad has been making stuffed peppers for dinner my entire life, and yet I have never eaten a single one. I grew up with this idea in my head that I hated peppers. I firmly believed this idea up until a few months ago. I don't know what changed, but suddenly here I was eating peppers multiple times a week. This recipe is once again another Pinterest find, but I tweaked it a little to my liking.
I am a vegetarian so I substituted the ground beef with a faux meat and it was fabulous. I made the regular ones for my meat-loving boyfriend and he agrees that these were to die for.
Please don't let my crappy phone quality picture deter you from making these peppers, because I promise you that they will change your life!
Ingredients
- 4-5 bell peppers, tops and insides removed (Use peppers other than green if possible)
- 1 pound lean ground beef
- 16 ounce jar salsa
- 1 cup shredded cheddar cheese
- 1 can black beans, rinsed and drained
- 1 small can of corn
- 1 onion, sauteed
- 1 envelope taco seasoning
- big handful baby spinach, rinsed
- Sour cream
Preheat the oven to 350 degrees F. Wash the peppers then carefully slice the tops off. To remove the insides, cut around the edges of the pepper then pull the center out with your hand. Try to get all the seeds out too. Place the peppers in a baking dish and set aside.
In a large skillet, brown the ground beef over medium high heat for about 7 to 8 minutes, or until it’s cooked through. Break up the meat with a wooden spoon while it cooks. When done, add in taco seasoning and salsa. Start with about 3/4 of the jar then add the rest if you want it juicier.
In separate pan, saute onions until tender. Add black beans (make sure they’re drained and rinsed), corn and baby spinach. Stir to combine. Cook until the spinach just starts to wilt, another minute or so. Remove pan from heat and mix into the meat.
Spoon the meat mixture into the hollowed out peppers. Fill the peppers almost to the top, leaving just enough room for the cheese. Sprinkle about 2 tablespoons of shredded cheese on top of each pepper.
Place in the preheated oven and cook for 30 to 45 minutes. The cheese should be melted and the pepper should soften. You can tent the baking dish with aluminum foil if the cheese is starting to brown.
Remove from the oven and garnish with a dollop of sour cream.
(Recipe found here.)
Monday, December 10, 2012
Oreo Crumble Cookies
While we're on the oreo theme, I might as well throw in another recipe! I was struck with need to bake cookies this weekend and eventually came out with these.
I'm currently living with at my boyfriend's house...which means there are not a ton of readily available baking supplies (other than the ones we've picked up for specific recipes in the past couple months). So when it came time to find a recipe for cookies, I was pretty limited with what I could make without running to the store to pick up more ingredients. I had some leftover oreos from the Cookies & Cream Hot Chocolate so I decided that they would make the perfect addition to these cookies.
I remembered seeing oreo chocolate chip cookies on Pinterest a million times, so I searched and found a recipe from Lovin' From The Oven. The only thing we didn't have in the kitchen was chocolate chips, but I figured the oreos would give it enough flavor that I didn't need them. After reading her comments on substituting baking powder for baking soda, and then seeing some other mention they did the same with great results, I decided to follow suit. Other than omitting the chocolate chips and replacing the baking soda, I followed the recipe exactly and they turned out fabulous! They were gone by the next morning (thanks mostly in part to my boyfriend).
I'm currently living with at my boyfriend's house...which means there are not a ton of readily available baking supplies (other than the ones we've picked up for specific recipes in the past couple months). So when it came time to find a recipe for cookies, I was pretty limited with what I could make without running to the store to pick up more ingredients. I had some leftover oreos from the Cookies & Cream Hot Chocolate so I decided that they would make the perfect addition to these cookies.
I remembered seeing oreo chocolate chip cookies on Pinterest a million times, so I searched and found a recipe from Lovin' From The Oven. The only thing we didn't have in the kitchen was chocolate chips, but I figured the oreos would give it enough flavor that I didn't need them. After reading her comments on substituting baking powder for baking soda, and then seeing some other mention they did the same with great results, I decided to follow suit. Other than omitting the chocolate chips and replacing the baking soda, I followed the recipe exactly and they turned out fabulous! They were gone by the next morning (thanks mostly in part to my boyfriend).
- 1 stick softened butter
- 6 Tablespoons sugar
- 6 Tablespoons brown sugar
- 1 egg
- 1 teaspoon vanilla
- 1 ¼ cup flour
- ½ teaspoon baking soda
- ½ teaspoon salt
- 11 broken pieces Oreo Cookies
- 1 cup chocolate chips
1. Preheat oven to 350 degrees F. Cream butter, and sugars until well combined. Add egg and vanilla until mixed well.
2. Place flour, baking soda and salt into a large bowl, stir to combine. Slowly add dry ingredients to wet ingredients then stir in oreos and chocolate chips until just combined.
3. With a medium cookie scoop, scoop onto baking sheet. Bake for 10 minutes or until cooked, but still soft. Let cool on baking sheet for 3 minutes before transferring to cooling rack.
(Recipe found here.)
Subscribe to:
Posts (Atom)